群辉Videos Station播放EAC3格式视频错误
安装ffmpeg插件
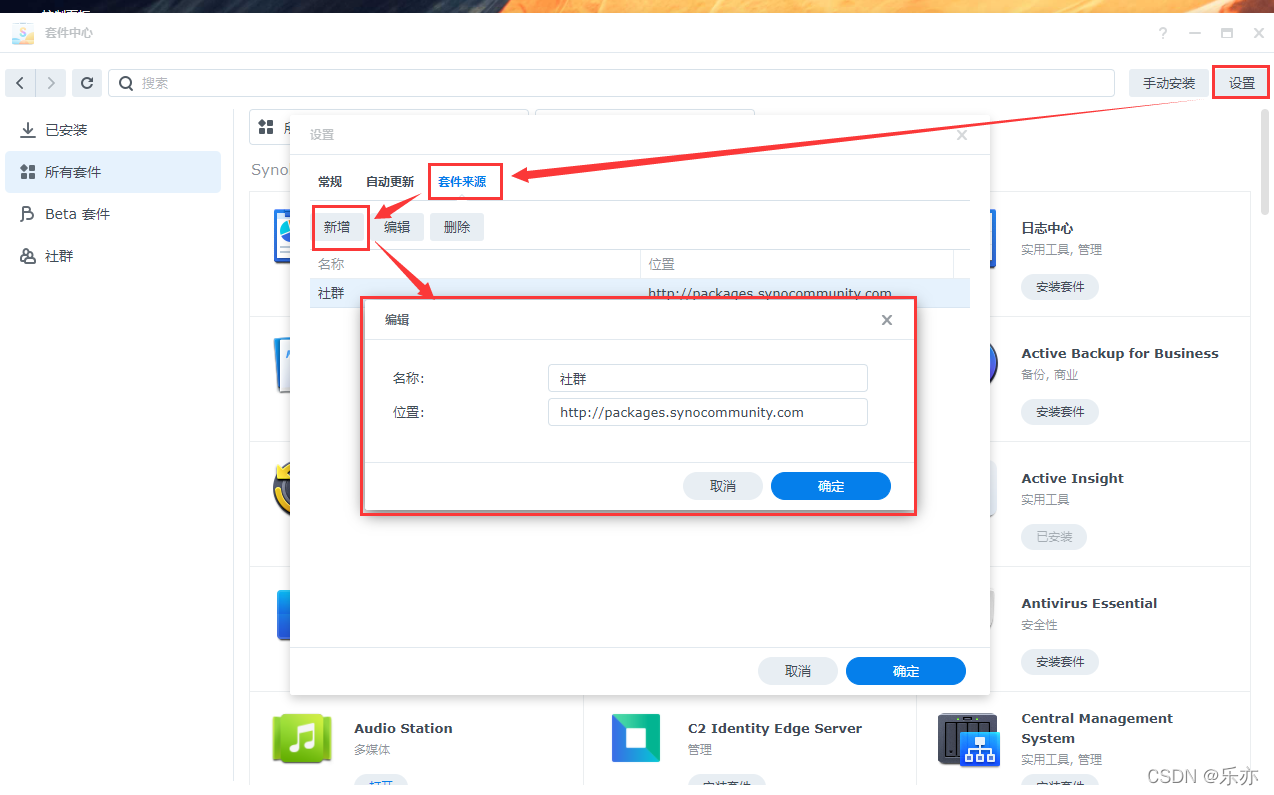
1. 添加这个社群来源

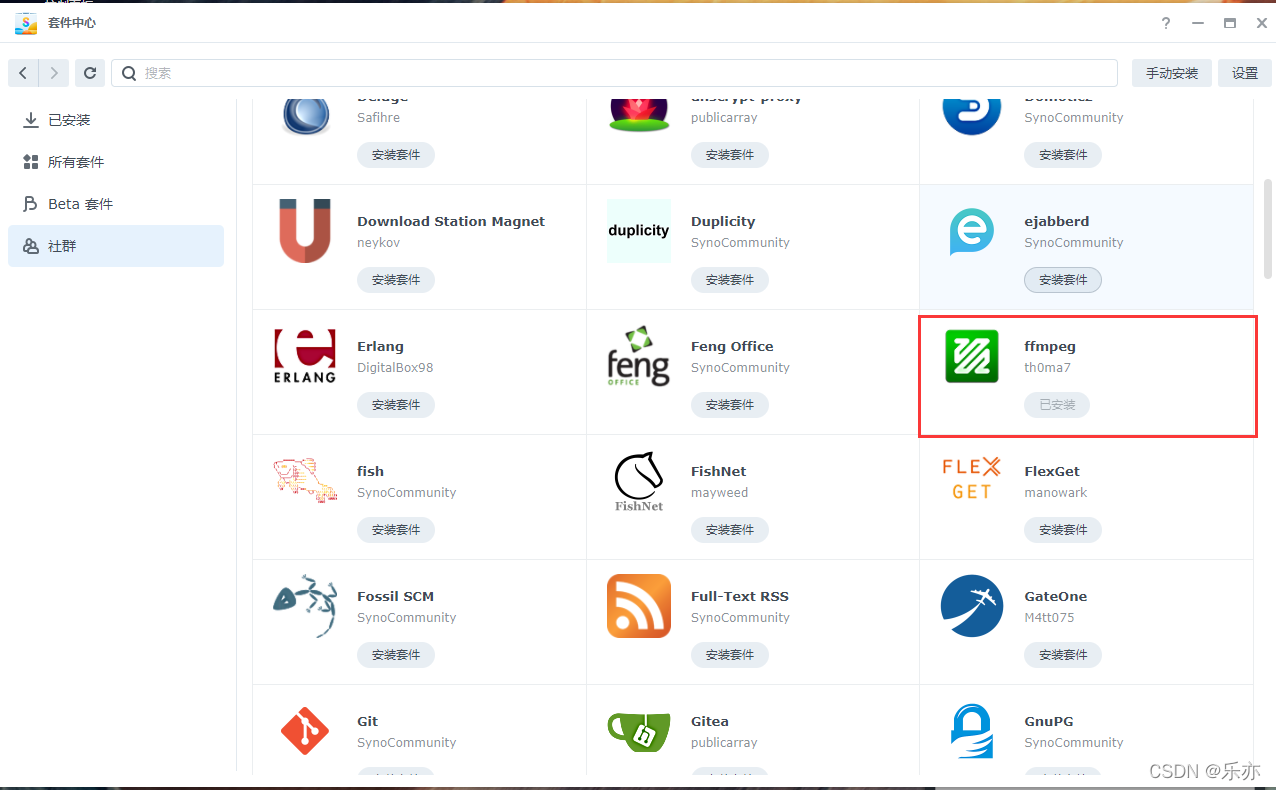
2. 安装该插件
❗️❗️❗️安装之前需要手动禁用video station❗️❗️❗️


安装补丁:
访问上面的地址查看相关说明,下面只是一部分说明
Dependencies:
- DSM 7.0-41890 (and above)
- Video Station 2.4.6-1594 (and above)
- SynoCommunity FFMPEG 6.0.2. (and above) (help)
- Advanced Media Extensions 1.0.0-50001 (and above). (The licence in AME must be LOADED and ACTIVATED.)
Optional Packages:
- MediaServer 1.1.0-0201 (and above) (OPTIONAL)
Supported / Unsupported scenarios:
- DTS or EAC3 or TrueHD or AAC + Any non standard video format: ✅
- no DTS, no EAC3, no TrueHD, no AAC + HEVC: ✅
- DTS or EAC3 or TrueHD or AAC (5.1 or 7.1) + HEVC: ✅
- DSM 7.X.X: ✅
- With DS-XXX PLAY Appliances or Low Powered Devices: ✅ (I recommend install the Simplest Wrapper. The Advanced needs better CPU or have a GPU available for FFmpeg binary for HEVC decoding.)
- DSM 6.2: ⚠️ The installer doesn´t support this version.
(In low powered devices you only will have remux of the audio or only be able to play it without transcoding.)
Instructions:
- Check that you meet the required dependencies
- Install SynoCommunity ffmpeg (help)
- Connect to your NAS using SSH (admin user required) (I recommend maximizing the window to read it better.) (help)
- Use the command
sudo -ito switch to root user- Use the following command (Basic command) to execute the patch
- You’ll have to re-run the patcher everytime you update VideoStation, Advanced Media Extensions and DSM
USAGE:
Basic Installation command:
bash -c "$(curl "https://raw.githubusercontent.com/darknebular/Wrapper_VideoStation/main/installer.sh")".
With options:
bash -c "$(curl "https://raw.githubusercontent.com/darknebular/Wrapper_VideoStation/main/installer.sh")" -- -s <Flags>
Flags Required Description start No The default flag going to the MAIN Menu. install No This install the Advanced Wrapper. autoinstall No This install the Advanced/Simplest Wrapper without prompts (Automatic Mode) uninstall No This flag uninstall the patch. (Simplest or the Advanced one). config No Change the behaviour of the audio codecs for the Advanced Wrapper info No Show the general info of the Installer
1、用电脑ssh远程连接到群晖上
2、切换到root用户
3、运行命令下面即可
bash -c "$(curl "https://raw.githubusercontent.com/darknebular/Wrapper_VideoStation/main/installer.sh")"
- 使用选项
bash -c "$(curl "https://raw.githubusercontent.com/darknebular/Wrapper_VideoStation/main/installer.sh")" -- -s <Flags>
选项含义
| Flags | Required | Description |
|---|---|---|
| start | No | The default flag going to the MAIN Menu. |
| install | No | This install the Advanced Wrapper. |
| autoinstall | No | This install the Advanced/Simplest Wrapper without prompts (Automatic Mode) |
| uninstall | No | This flag uninstall the patch. (Simplest or the Advanced one). |
| config | No | Change the behaviour of the audio codecs for the Advanced Wrapper |
| info | No | Show the general info of the Installer |
常见问题解决
ssh证书报错
curl https://raw.githubusercontent.com/AlexPresso/VideoStation-FFMPEG-Patcher/main/patcher.sh  | bash
---
  0     0    0     0    0     0      0      0 --:--:-- --:--:-- --:--:--     0
curl: (60) SSL certificate problem: unable to get local issuer certificate
More details here: https://curl.se/docs/sslcerts.html
-
这个错误信息表明在使用
curl命令时遇到了 SSL 证书问题。具体来说,curl无法验证服务器的 SSL 证书,因为它没有找到相应的本地发行者证书。解决方式有下面的两种- 可以选择安装证书
- 直接下载对应文件脚本运行
我选择最简单的下载文件
开始解决
-
访问
https://raw.githubusercontent.com/darknebular/Wrapper_VideoStation/main/installer.sh发现是一个命令脚本
#!/bin/bash # Download the script called installer_OffLine.sh in /tmp/ curl -L --max-filesize 512000 -o /tmp/installer_OffLine.sh "https://raw.githubusercontent.com/darknebular/Wrapper_VideoStation/main/installer_OffLine.sh" # Give execution permissions to the downloaded script chmod +x /tmp/installer_OffLine.sh # Run installer.sh passing the supplied arguments to the installer_OffLine.sh script /bin/bash /tmp/installer_OffLine.sh "$@" # Delete the downloaded script rm /tmp/installer_OffLine.sh -
查看命令是下载一个文件后执行此文件内的脚本,继续查看
https://raw.githubusercontent.com/darknebular/Wrapper_VideoStation/main/installer_OffLine.sh发现这个
installer_OffLine.sh是最终脚本 -
将这个脚本使用
ctrl + s保存下来,叫什么都行,这里就叫installer_OffLine.sh了 -
将保存的文件上传到你的nas中,在哪里你自定义,这里以
/tmp/目录为例 -
最开始的脚本复制启动的两行命令,运行一下
chmod +x /tmp/installer_OffLine.sh /bin/bash /tmp/installer_OffLine.sh "$@" -
这样就可以了
